
By using the Synchronization of Google Calendar, the user can transfer LeadBooker appointments to the Google Calendar and Google calendar appointments/events to the LeadBooker CRM as per Calendar Sync Settings. Whenever the user adds a new appointment/event from Google Calendar, the appointment will be added to LeadBooker CRM. If the user adds a new appointment from LeadBooker CRM, the appointment will be added to the Google Calendar as per the Calendar Sync Settings.
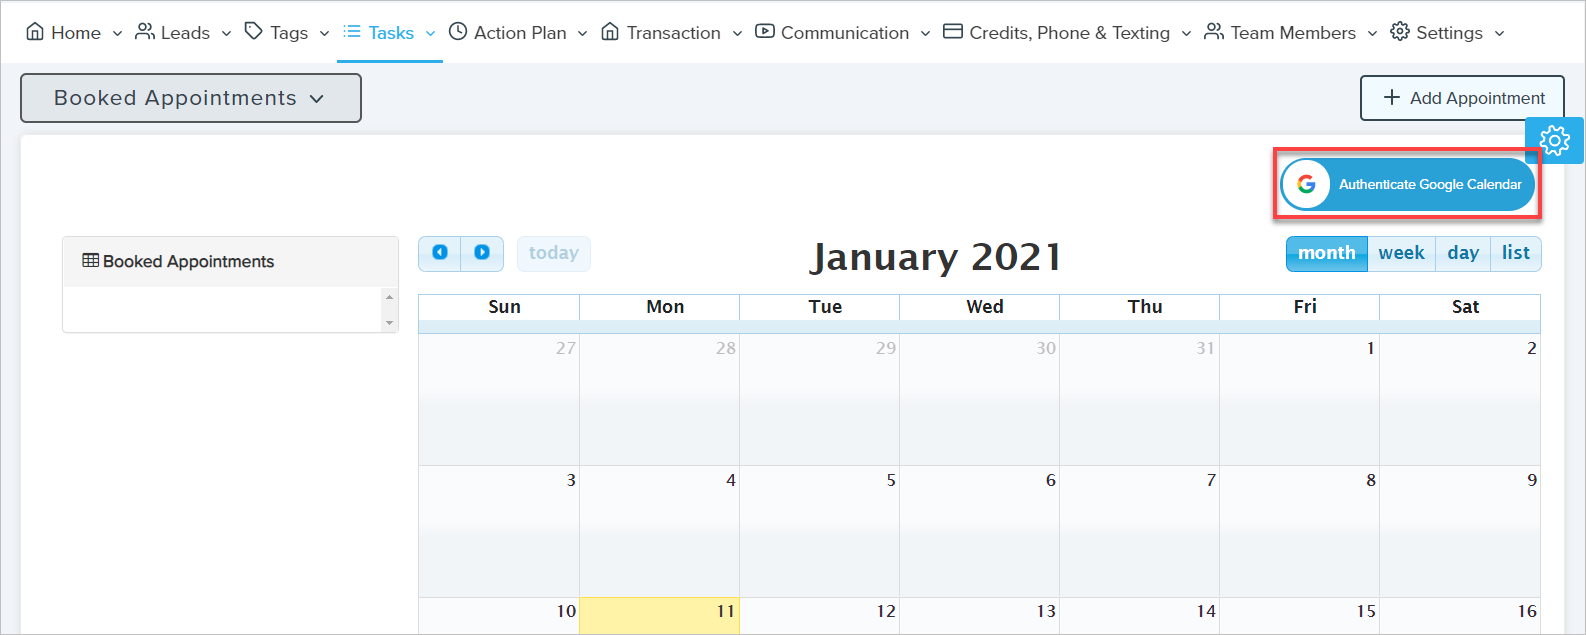
To Synchronize Google calendar with LeadBooker CRM, log in to LeadBooker CRM ![]() hover on the Tasks menu. Click View Booked Appointments as shown in the below image:
hover on the Tasks menu. Click View Booked Appointments as shown in the below image:

Click Authenticate Google Calendar as shown below.
The user will be redirected to the Connect Your Google Account page. Then click on the "Connect With Google" button as shown below.
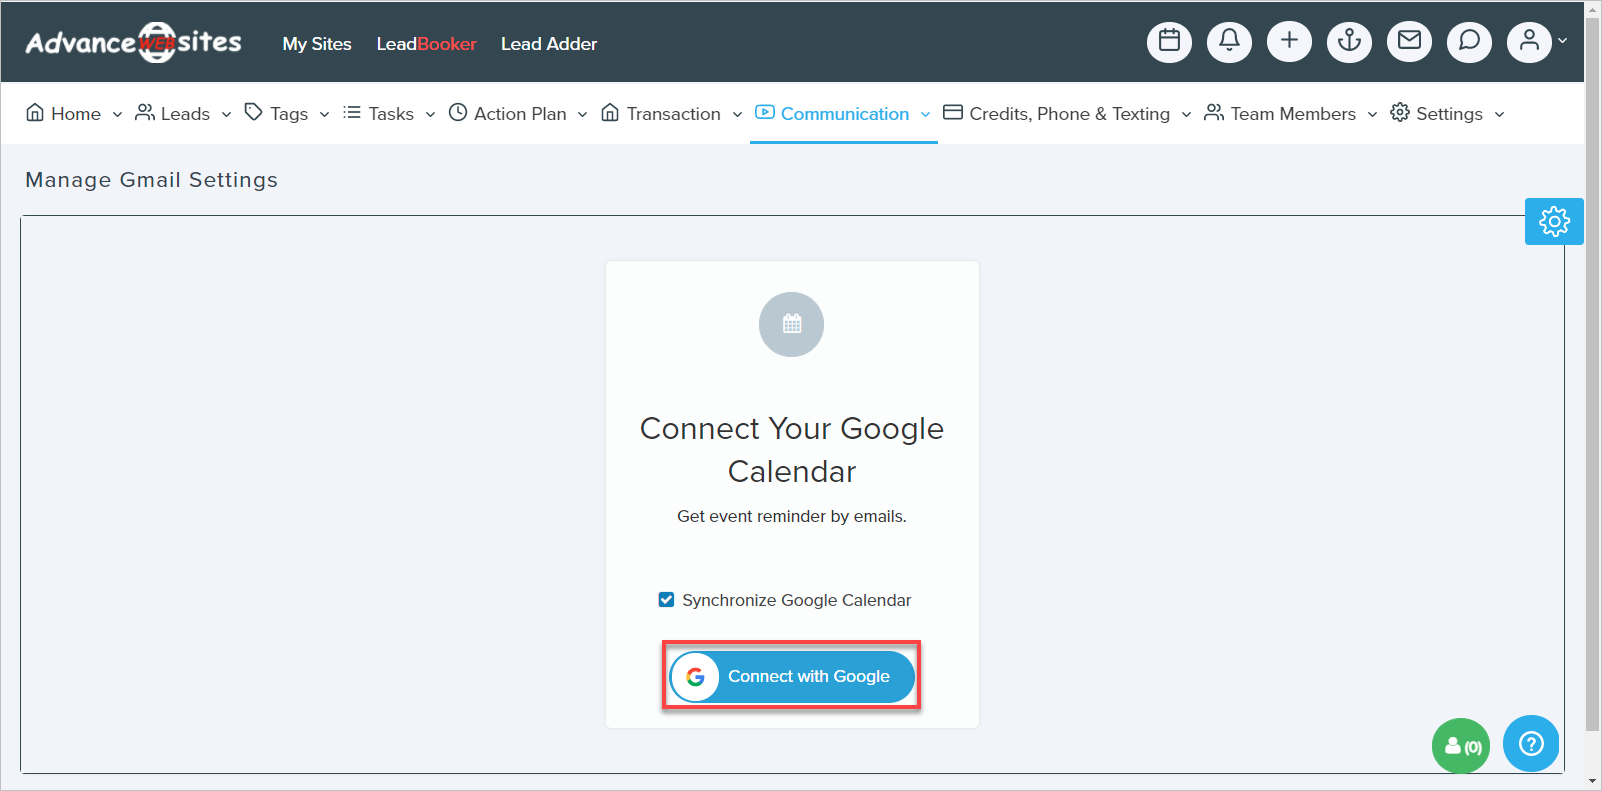
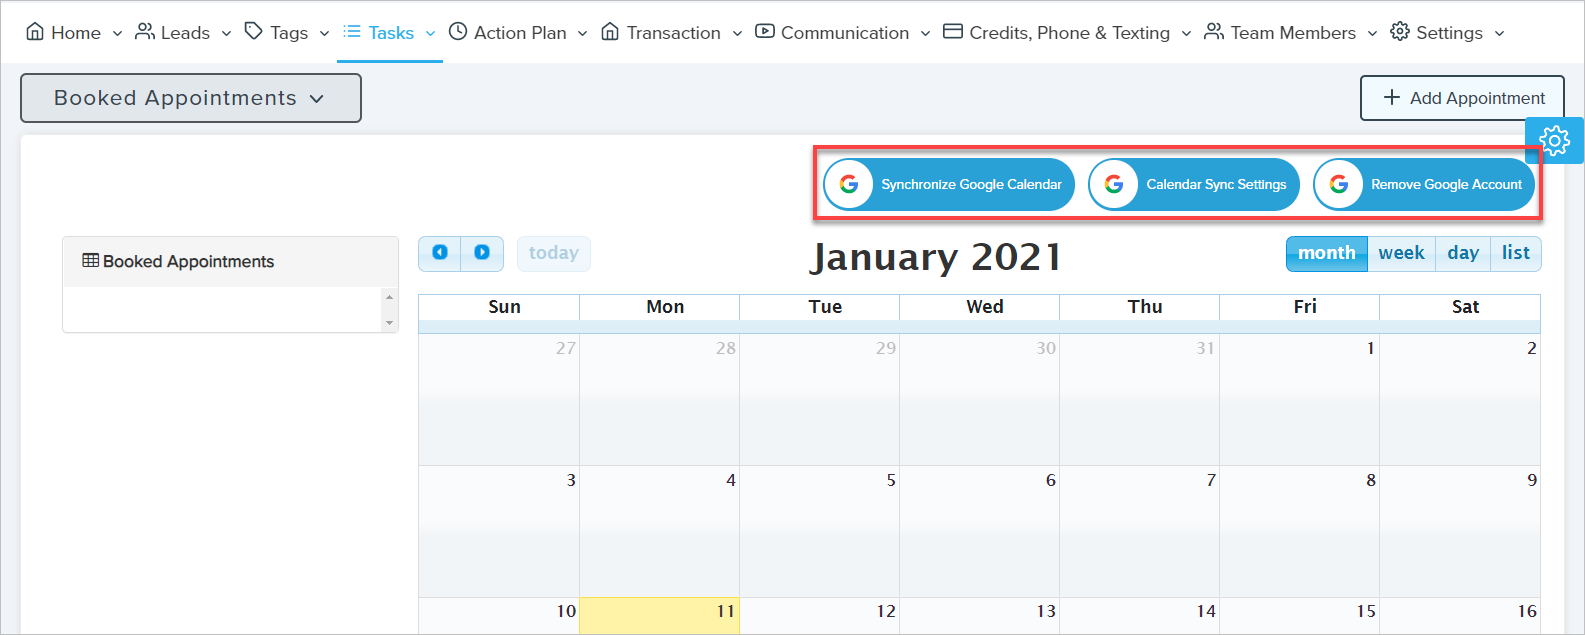
The user will be asked to sign in with a Google account. Sign in with the Google account you want to synchronize with LeadBooker CRM and allow the permissions. After allowing permissions and successful authentication you will be redirected to LeadBooker. Now three buttons will appear on LeadBooker's View Booked Appointments page as listed below.
1) Synchronize Google Calendar
2) Calendar Sync Settings
3) Remove Google Account
1) Synchronize Google Calendar: By clicking Synchronize Google Calendar, the user can add all synchronized Google Calendar's old appointments/events to LeadBooker CRM and all old LeadBooker CRM's appointments to the synchronized Google Calendar immediately. To add appointment/events, click Synchronize Google Calendar. A pop-up will open with a drop-down having three options as shown below.
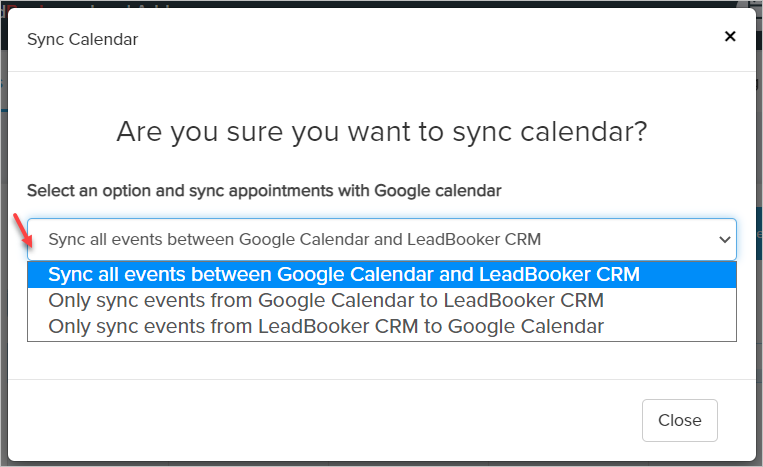
A) Sync all events between Google Calendar and LeadBooker CRM: By selecting this option, all old Google Calendar's appointments/events will be added to LeadBooker CRM and all old LeadBooker CRM's appointments to the Google Calendar immediately.
B) Only sync events from Google Calendar to LeadBooker CRM: By selecting this option, all old Google Calendar's appointments/events will be added to LeadBooker CRM immediately.
C) Only sync events from LeadBooker CRM to Google Calendar: By selecting this option, all old LeadBooker CRM's appointments will be added to the Google Calendar immediately.
Note: By default, old appointments will not be transferred. To transfer old appointments as per the Synchronize Google Calendar.
2) Synchronize Google Calendar: By clicking on Calendar Sync Settings, the user can manage whether the newly added appointment from LeadBooker will be added on Google Calendar or not. And whether a newly added appointment/event from Google Calendar will be added on LeadBooker CRM or not. To manage Calendar Sync Settings, click Calendar Sync Settings. A pop-up will open with a select-box having three options as shown below.
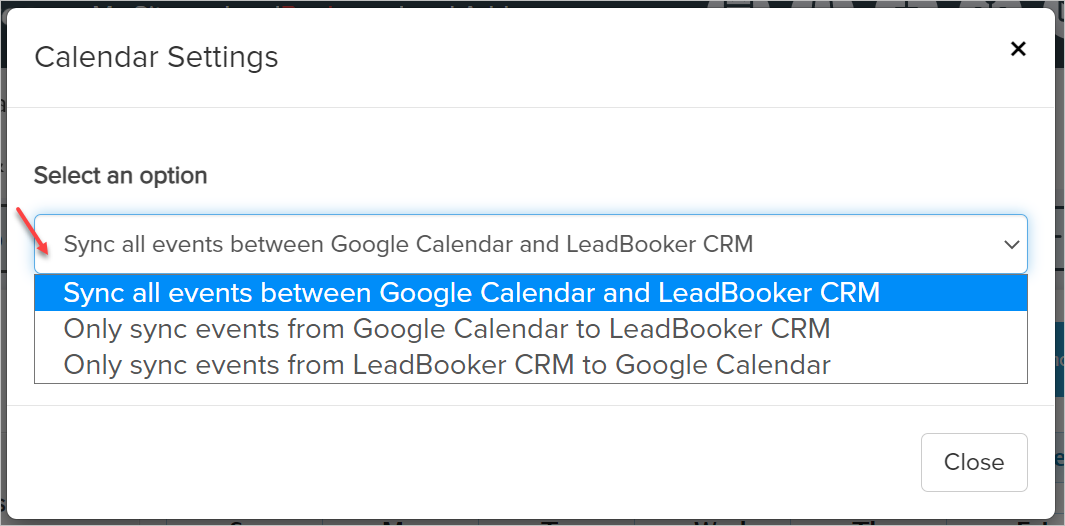
A) Sync all events between Google Calendar and LeadBooker CRM: By selecting this option, whenever the user adds a new appointment/event from Google Calendar, the appointment will be added to LeadBooker CRM and if the user adds the new appointment from LeadBooker CRM, the appointment will be added to the Google Calendar.
B) Only sync events from Google Calendar to LeadBooker CRM: By selecting this option, whenever the user adds a new appointment/event from the Google Calendar, the appointment will be added to LeadBooker CRM.
C) Only sync events from LeadBooker CRM to Google Calendar: By selecting this option, whenever the user adds a new appointment from LeadBooker CRM, the appointment will be added to the Google Calendar.
Note: By default, a two way (Sync all events between Google Calendar and LeadBooker CRM) transfer is activated for the calendar.
3) Remove Google Account: To remove a Synchronized Google account from LeadBooker CRM, click on the Remove Google Account button. The user will be redirected to the Remove Google Account page. Click Remove Google Account link as shown below.
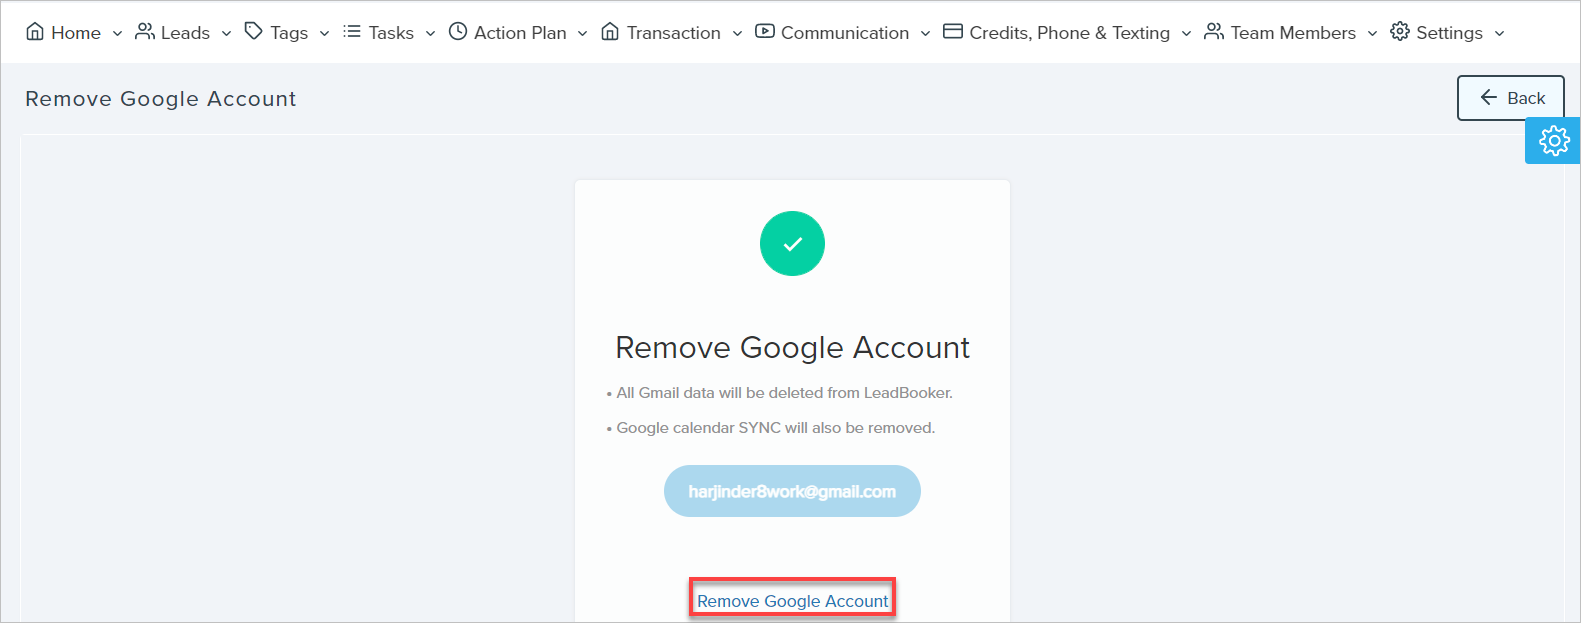
Note: Google calendars will be unsynchronized/removed from LeadBooker CRM.
Comments
0 comments
Please sign in to leave a comment.